Survival is about keeping a build useful after the opening
Survival is the game’s endless mode: open maps, continuing hordes and a run measured by how long you can stay alive. A comfortable first ten minutes is useful, but it is not evidence that the same damage and recovery will carry a long attempt. Treat the opening as a chance to assemble an engine, rather than the whole test.
The menu calls this mode Survival. Lavender Tower’s Floors of the Beyond are a separate event progression, not the same leaderboard. Check the mode before committing Bag supplies or setting an achievement target. If you want a specific reward, read its actual condition; a Classic clear, a Survival duration and a Tower floor are different results.
Choose recovery you can keep triggering
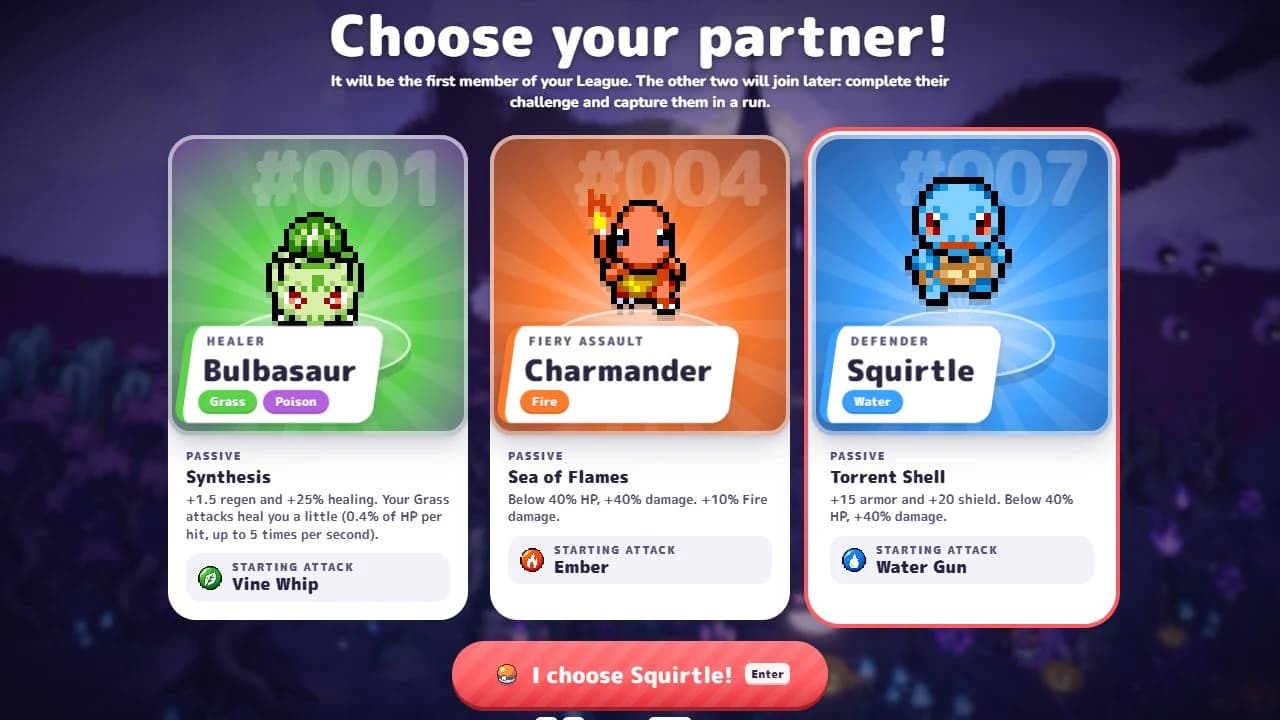
Bulbasaur is a useful starting point when small hits wear you down: its Grass-hit recovery rewards attacks that continue connecting while you move. That makes attack coverage part of your defense. If the crowd blocks your escape, however, a healing passive does not turn the middle of that crowd into a safe place.
Squirtle provides armor and shield, which makes early mistakes less punishing. Chansey is worth comparing when recovery is your limiting factor. These are recommendations for learning and consistency, not a claim that any one partner owns the longest-run record. A kit whose attack pattern you can aim and sustain may serve you better than a higher score in an opening-focused tier model.
Keep the same map, difficulty and partner while evaluating a change. If you change all three and last longer, you cannot tell whether the new item helped or the opening simply suited that partner. Use the pause panel to inspect the build you actually have, including the level-up modifiers on each move.

Build damage and space at the same time
A long run needs more than one attractive damage number. Ask whether your attacks reach the enemies that close your exits, whether they keep connecting while you move, and whether you can finish tougher targets before the next crowd removes your room. An attack that covers your escape route can be more useful than another underleveled attack with a large tooltip.
Match vitamins to the damage class listed for the move. An elemental theme does not guarantee that every attack in the kit uses the same class. In the current pause panel, inspect the combined level-up bonuses instead of comparing only level-one definitions. If coverage is already comfortable but tough enemies survive, invest in the attack doing the work before filling every empty slot.
Plan a fusion without abandoning the current run
Both eligible ingredients need level 8 at Bill’s Machine. That is a real investment in offers and slots. Pick a pair whose ingredients help before they fuse, and have a fallback if the second ingredient never arrives. Holding a weak move for a planned result can cost more health than the eventual fusion returns.
For Bulbasaur, compare Razor Leaf plus Solar Beam for Flower Beam. For Squirtle, Rapid Spin plus Hydro Pump gives Hydro Spiral. Check the fusion entries in Attacks for the exact pair and the resulting pattern. Signature pairs take priority over reactions and same-type outcomes; weather, buff and existing fusion patterns are not eligible ingredients.
Fusion stars and ordinary move levels use different limits. Fusion Star Shard adds one to the fusion-star cap, while the corresponding move and vitamin cap items have their own effects. Read the item and your current panel rather than assuming that every cap bonus raises everything by the same amount.
| Partner | Signature fusion | Ingredients at Lv. 8 |
|---|---|---|
| Bulbasaur | Flower Beam | Razor Leaf + Solar Beam |
| Squirtle | Hydro Spiral | Rapid Spin + Hydro Pump |
Prepare for the 45-minute Mewtwo encounter
The current game includes a Survival achievement for defeating Mewtwo at minute 45. Use that as a planning checkpoint, not an invitation to wait motionless until the clock changes. Before a major encounter, collect safely, identify the route you can keep moving through and check whether your main attacks still deal meaningful damage to durable targets.
During the fight, judge danger from the arena and telegraphs rather than the boss health bar alone. Losing a safe route to chase one pickup is a poor exchange when a long attempt is at stake. If damage stalls, note the attack classes, coverage and upgrade choices that got you there; repeating the same purchases with a different cosmetic does not answer that problem.
Use migration and side activities when they improve your position
Published Survival updates add migration portals, comets, regenerating altars, Ditto and Hypno. Their appearance is an opportunity to evaluate, not a requirement to cross a dangerous crowd. Keep a way back out of the interaction and decide what the run needs before spending time or resources on it.
A portal can change the situation you are playing in. Read its prompt and check your health and nearby enemies before committing. The game also distinguishes ordinary progression, seasonal challenges and cosmetic targets. For Mastery Looks, inspect the specific mode and objective. Most challenges can count in co-op now, but hit-limit challenges still require a solo run; a long Survival result is not automatically a Classic win.
Keep a long session stable
A long attempt also tests your browser. The official notes include performance work for Survival past 100 minutes, but that does not guarantee identical performance on every device. Choose settings that keep movement readable, close unrelated heavy tabs and notice sustained frame drops before they begin causing contact damage.
Before a long attempt, check the game’s account and save options. If performance becomes uneven, note when it starts and whether reducing effects restores readable movement. Record the mode, map, difficulty and game version alongside the attacks and items that worked; that makes the next attempt easier to compare without blaming every failure on the partner.
Read the Survival ranking correctly
The regional Survival record is your best duration on that map, with KOs breaking a tie. The Global board adds regional bests. Improving a weaker regional record can therefore matter more to your Global total than adding a few seconds to a region you have already pushed hard.
Our leaderboard keeps its capture date visible because rankings change. The personal tier board serves a different purpose again: it lets you record your own opinion of all 151 species. The editorial kit comparison emphasizes Classic openings and should be a shortlist for Survival experiments, not proof of late-run scaling.
Review one limit before the next attempt
After a run, write down the first problem you could not recover from: no escape route, insufficient damage on durable enemies, recovery that stopped triggering, or a device that could not keep up. Then choose one change. That might be a different attack, a defensive upgrade, a more useful fusion pair or lower graphics settings.
Check Lab costs before spending the Stardust you earned. Extra capacity helps only if you have useful offers to put in it; another damage level helps only if the attack can reach its target. Keep the next goal specific enough that you can tell whether the purchase helped when you reach the same point again.
Check move kits, fusion recipes and Lab costs
Check a partner’s kit, compare two fusion ingredients or add up your next Lab purchase before starting another run.